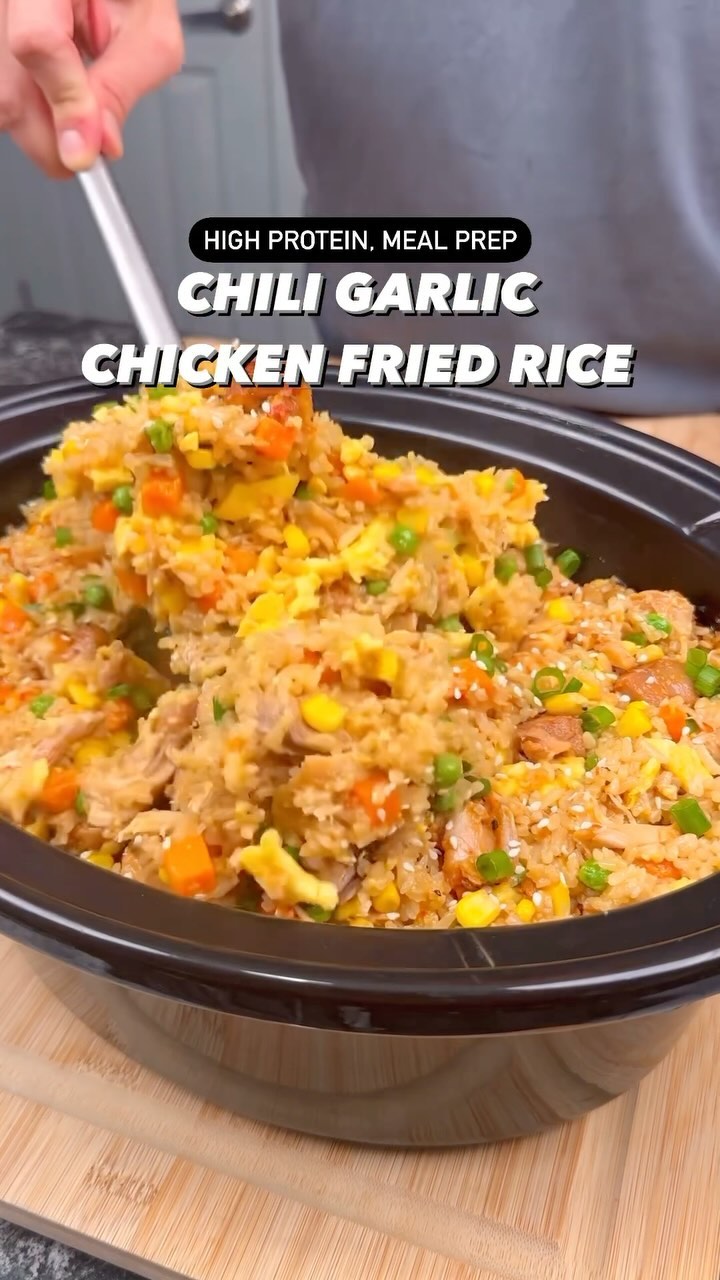
Chili Garlic Chicken Fried Rice
Dive into a bowl of our zesty Chili Garlic Chicken Fried Rice, where every bite bursts with flavor and packs a protein punch! Featuring tender chicken, vibrant veggies, and a kick of garlic, this dish is not only a delicious way to fuel your day but also a meal prep superstar, all under 600 calories per serving. Get ready to spice up your weeknight dinners and keep those taste buds dancing!
Prep
15
min
Cook
30
min
Serves
10
people
Level
intermediate
📝 Ingredients
Serves 10🥬Fresh Produce(3)
- 1 tablespoon minced ginger (15 ml)
- Chopped green onions
- Add water until desired consistency
🥩Meat & Seafood(1)
- 48oz chicken thighs, sliced in half (1.36 kg)
🥛Dairy & Eggs(3)
- 6 eggs
- 400g egg whites (14.1 oz)
- 150g nonfat skyr or greek yogurt (5.29 oz)
🫙Pantry Staples(7)
- 1400g day-old cooked rice (600g dry/uncooked weight) (49.4 oz)
- 3 tablespoons honey (60g) (45 ml)
- 3 tablespoons honey (45 ml)
- 1 tablespoon rice vinegar (15 ml)
- 2 tablespoons rice vinegar (30 ml)
- Splash of rice vinegar
- 2 tablespoons toasted sesame oil (30 ml)
🧂Spices & Seasonings(1)
- Salt & pepper to taste
🍯Sauces & Condiments(6)
- 4 tablespoons chili garlic sauce (60 ml)
- 2 tablespoons fish sauce (30 ml)
- 2 tablespoons gochujang (30 ml)
- 2 tablespoons soy sauce (30 ml)
- 4 tablespoons soy sauce (60 ml)
- 2 tablespoons sriracha (30 ml)
📦Other(2)
- 50g light Mayo (1.76 oz)
- 600g mixed frozen veggies of choice (21.2 oz)
👨🍳 Instructions
- 1
Slice the chicken thighs in half and toss them in the slow cooker. Add all the ingredients for the chicken and mix well. Cook for 2-3 hours on high or 3-4 hours on low.
- 2
Preheat the oven to 475 degrees. Switch to high broil right before adding the sheet pan with rice. Cook for 10-25 minutes until crispy bits form on the exterior.
- 3
Scrape the edges and mix the rice, then add frozen veggies over the top. Return to the oven under broil for 10-15 minutes.
- 4
Add the rice and veggies to the slow-cooked chicken.
- 5
To the same sheet pan, add the egg and egg white mixture. Bake for 3-4 minutes or until mostly cooked through, then chop into small pieces and add to the fried rice and chicken.
- 6
Top with additional sesame oil and chopped green onions, then mix well.
- 7
For the low-calorie spicy mayo, mix together all the mayo ingredients and adjust with water to achieve the desired consistency.
💡 Pro Tips
- ✓Use day-old, refrigerated cooked rice rather than freshly cooked rice for the sheet pan step, since cold rice grains have firmer, drier starch structures that separate easily and crisp up under the broiler instead of steaming into a mush.ingredient24 hours refrigeration
- ✓Spread the rice in a thin, even layer no more than 1/2 inch deep on the sheet pan before broiling, because a thick pile traps steam and prevents the Maillard browning reactions needed for crispy, toasted bits.technique1/2 inch layer
- ✓Cook the chicken thighs on low for 3-4 hours rather than high for 2-3 hours when possible, since the slower ramp allows collagen in the thigh connective tissue to convert to gelatin more thoroughly without overcooking the muscle fibers.timing3-4 hours on low
- ✓Add the frozen vegetables directly from the freezer without thawing during the second broil phase, because the ice crystals flash-evaporate under high heat, creating brief localized steam that cooks them through in 10-15 minutes without turning the rice soggy.timing10-15 minutes
- ✓Whisk the egg and egg white mixture vigorously for 30 seconds before pouring onto the hot sheet pan, since incorporating air bubbles creates a lighter, fluffier texture that shreds into distinct small pieces rather than clumping into a dense sheet when chopped.technique30 seconds whisking
Share this recipe
Prep
15
min
Cook
30
min
Serves
10
people
Level
intermediate
Share this recipe
Chili Garlic Chicken Fried Rice
Dive into a bowl of our zesty Chili Garlic Chicken Fried Rice, where every bite bursts with flavor and packs a protein punch! Featuring tender chicken, vibrant veggies, and a kick of garlic, this dish is not only a delicious way to fuel your day but also a meal prep superstar, all under 600 calories per serving. Get ready to spice up your weeknight dinners and keep those taste buds dancing!
📝 Ingredients
Serves 10🥬Fresh Produce(3)
- 1 tablespoon minced ginger (15 ml)
- Chopped green onions
- Add water until desired consistency
🥩Meat & Seafood(1)
- 48oz chicken thighs, sliced in half (1.36 kg)
🥛Dairy & Eggs(3)
- 6 eggs
- 400g egg whites (14.1 oz)
- 150g nonfat skyr or greek yogurt (5.29 oz)
🫙Pantry Staples(7)
- 1400g day-old cooked rice (600g dry/uncooked weight) (49.4 oz)
- 3 tablespoons honey (60g) (45 ml)
- 3 tablespoons honey (45 ml)
- 1 tablespoon rice vinegar (15 ml)
- 2 tablespoons rice vinegar (30 ml)
- Splash of rice vinegar
- 2 tablespoons toasted sesame oil (30 ml)
🧂Spices & Seasonings(1)
- Salt & pepper to taste
🍯Sauces & Condiments(6)
- 4 tablespoons chili garlic sauce (60 ml)
- 2 tablespoons fish sauce (30 ml)
- 2 tablespoons gochujang (30 ml)
- 2 tablespoons soy sauce (30 ml)
- 4 tablespoons soy sauce (60 ml)
- 2 tablespoons sriracha (30 ml)
📦Other(2)
- 50g light Mayo (1.76 oz)
- 600g mixed frozen veggies of choice (21.2 oz)
👨🍳 Instructions
- 1
Slice the chicken thighs in half and toss them in the slow cooker. Add all the ingredients for the chicken and mix well. Cook for 2-3 hours on high or 3-4 hours on low.
- 2
Preheat the oven to 475 degrees. Switch to high broil right before adding the sheet pan with rice. Cook for 10-25 minutes until crispy bits form on the exterior.
- 3
Scrape the edges and mix the rice, then add frozen veggies over the top. Return to the oven under broil for 10-15 minutes.
- 4
Add the rice and veggies to the slow-cooked chicken.
- 5
To the same sheet pan, add the egg and egg white mixture. Bake for 3-4 minutes or until mostly cooked through, then chop into small pieces and add to the fried rice and chicken.
- 6
Top with additional sesame oil and chopped green onions, then mix well.
- 7
For the low-calorie spicy mayo, mix together all the mayo ingredients and adjust with water to achieve the desired consistency.
💡 Pro Tips
- ✓Use day-old, refrigerated cooked rice rather than freshly cooked rice for the sheet pan step, since cold rice grains have firmer, drier starch structures that separate easily and crisp up under the broiler instead of steaming into a mush.ingredient24 hours refrigeration
- ✓Spread the rice in a thin, even layer no more than 1/2 inch deep on the sheet pan before broiling, because a thick pile traps steam and prevents the Maillard browning reactions needed for crispy, toasted bits.technique1/2 inch layer
- ✓Cook the chicken thighs on low for 3-4 hours rather than high for 2-3 hours when possible, since the slower ramp allows collagen in the thigh connective tissue to convert to gelatin more thoroughly without overcooking the muscle fibers.timing3-4 hours on low
- ✓Add the frozen vegetables directly from the freezer without thawing during the second broil phase, because the ice crystals flash-evaporate under high heat, creating brief localized steam that cooks them through in 10-15 minutes without turning the rice soggy.timing10-15 minutes
- ✓Whisk the egg and egg white mixture vigorously for 30 seconds before pouring onto the hot sheet pan, since incorporating air bubbles creates a lighter, fluffier texture that shreds into distinct small pieces rather than clumping into a dense sheet when chopped.technique30 seconds whisking