Korean kimchi's fermentation creates natural MSG after 3-4 weeks, which is why this fried egg tastes impossibly savory.
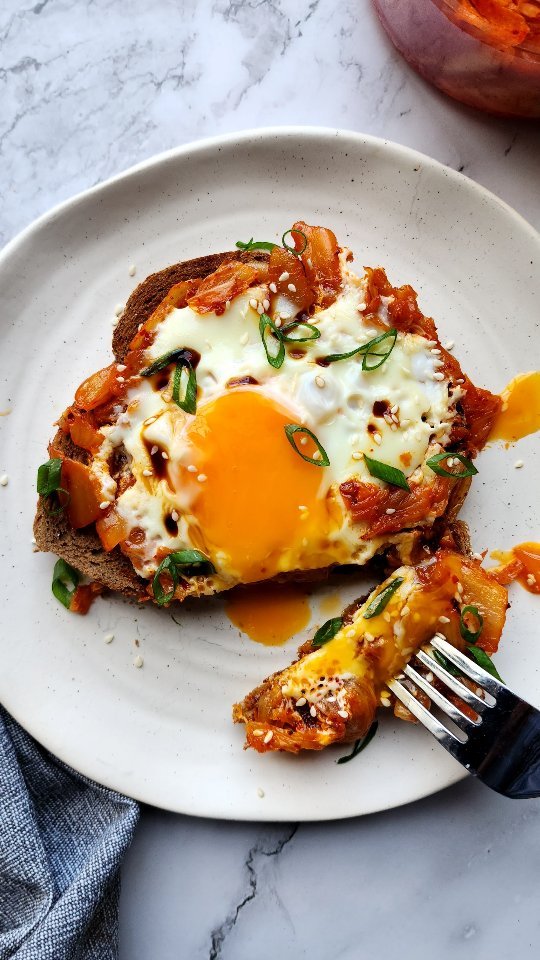
Kimchi Fried Egg
Whip up a delightful Kimchi Fried Egg in no time—ideal for those busy work-from-home breaks or a quick energy boost before hitting the gym! With vibrant kimchi, perfectly fried eggs, and a dash of sesame oil, this dish packs a flavorful punch that will satisfy your cravings. Get ready to enjoy a tasty fusion that’s as easy to make as it is to eat!
Prep
5
min
Cook
5
min
Serves
1
people
Level
beginner
📝 Ingredients
Serves 1🥬Fresh Produce(1)
- soy sauce, sesame seeds, spring onion greensoptional
🥛Dairy & Eggs(1)
- 1 egg
🫙Pantry Staples(1)
- 2 tsp oil (olive, avocado, whatever ya fancy) (10 ml)any oil you prefer
📦Other(1)
- 1/2 cup kimchi (120 ml)
👨🍳 Instructions
- 1
Heat oil in a small frying pan over medium high heat. Fry the kimchi for about 4-5 minutes or until it turns a deep red and starts caramelising.
- 2
Spread the kimchi out into a circle shape, making it slightly thicker on the edges, then crack the egg directly in the centre. Fry for 1 minute then cover with a lid and fry for a further 30 seconds or until the whites set. Use a spatula to remove from pan - top with optional toppings like soy sauce, sesame seeds and spring onion greens then devour with rice or toast.
💡 Pro Tips
- ✓Heat your oil to 350°F before adding kimchi so the sugars caramelize rapidly without overcooking the vegetables, creating deeper umami flavors through the Maillard reaction.technique350°F
- ✓Use aged kimchi that's 7-14 days old because the fermentation has broken down cell walls, allowing faster caramelization and more concentrated flavor development.ingredient7-14 days aged
- ✓Create a 1/4-inch thick kimchi border to contain the egg white and prevent spreading, while the thicker edges continue caramelizing as the egg cooks.technique1/4-inch thick
- ✓Cover the pan immediately after 1 minute to create steam that sets the egg white at 140°F while keeping the yolk at 145°F for optimal runniness.timing1 minute uncovered, 30 seconds covered
- ✓Drain excess kimchi juice before frying to prevent steaming and achieve proper caramelization, as water content above 85% inhibits browning reactions.technique85% water content threshold
Share this recipe
Prep
5
min
Cook
5
min
Serves
1
people
Level
beginner
Share this recipe
Korean kimchi's fermentation creates natural MSG after 3-4 weeks, which is why this fried egg tastes impossibly savory.
Kimchi Fried Egg
Whip up a delightful Kimchi Fried Egg in no time—ideal for those busy work-from-home breaks or a quick energy boost before hitting the gym! With vibrant kimchi, perfectly fried eggs, and a dash of sesame oil, this dish packs a flavorful punch that will satisfy your cravings. Get ready to enjoy a tasty fusion that’s as easy to make as it is to eat!
📝 Ingredients
Serves 1🥬Fresh Produce(1)
- soy sauce, sesame seeds, spring onion greensoptional
🥛Dairy & Eggs(1)
- 1 egg
🫙Pantry Staples(1)
- 2 tsp oil (olive, avocado, whatever ya fancy) (10 ml)any oil you prefer
📦Other(1)
- 1/2 cup kimchi (120 ml)
👨🍳 Instructions
- 1
Heat oil in a small frying pan over medium high heat. Fry the kimchi for about 4-5 minutes or until it turns a deep red and starts caramelising.
- 2
Spread the kimchi out into a circle shape, making it slightly thicker on the edges, then crack the egg directly in the centre. Fry for 1 minute then cover with a lid and fry for a further 30 seconds or until the whites set. Use a spatula to remove from pan - top with optional toppings like soy sauce, sesame seeds and spring onion greens then devour with rice or toast.
💡 Pro Tips
- ✓Heat your oil to 350°F before adding kimchi so the sugars caramelize rapidly without overcooking the vegetables, creating deeper umami flavors through the Maillard reaction.technique350°F
- ✓Use aged kimchi that's 7-14 days old because the fermentation has broken down cell walls, allowing faster caramelization and more concentrated flavor development.ingredient7-14 days aged
- ✓Create a 1/4-inch thick kimchi border to contain the egg white and prevent spreading, while the thicker edges continue caramelizing as the egg cooks.technique1/4-inch thick
- ✓Cover the pan immediately after 1 minute to create steam that sets the egg white at 140°F while keeping the yolk at 145°F for optimal runniness.timing1 minute uncovered, 30 seconds covered
- ✓Drain excess kimchi juice before frying to prevent steaming and achieve proper caramelization, as water content above 85% inhibits browning reactions.technique85% water content threshold